Everything you need to know about JSON Web Token

Before we start, I have to admit that this article does not really include everything you need to know about JSW (JSON Web Token). If you want to go into full-nerd mode, you can explore all the information available in the JWT RFC, though even that might not cover everything.
If you continue reading, keep in mind that this is a more conceptual guide and includes almost no code examples. If you are looking for an article that explains how to use JWT for a specific use case with a specific language implementation, you are in the wrong place. With that out of the way, let's get started.
What is JWT
JWT is an open industry standard (RFC 7519) that defines compact, simple and self-contained way to securely share information between two entities. As the name implies, information contained in JWT is provided in JSON format.
JWT is specifically made to be used in environments like HTTP Authorization headers and URI query parameters. This makes JWT a great option for authentication and authorization purposes as well as information exchange. It consists of three different components: the header, payload, and signature.

Header and payload are formatted using JSON format, while signature usually get generated one way or another. Every component serves a specific purpose, and JWT is not complete if either of these components are missing.
We will talk much more about JWT components, but for now, let's introduce them so we have an idea of what they look like.
Payload
The payload holds the actual data that we want to secure and transmit using JWT. It can literally be anything. Take a look at the following example.
1{
2  "name": "John Doe",
3  "moderator": true
4}
The payload is written in JSON format and includes key-values pairs, also known as claims.
Header
The header component of a JWT contains metadata about the token and the cryptographic algorithms used to secure it.
1{
2  "alg": "HS256",
3  "typ": "JWT"
4}
It typically consists of two parts:
typ(Type): declare the media type.alg(Algorithm): signing algorithm used to sign JWT.
There are also more properties that you can specify in the header, but only alg is required. The header is very important, especially for token verification, since it provides information about the algorithm used to sign JWT.
Signature
The signature is the final component of a JWT. It is generated by combining the encoded header, encoded payload, and a secret key known only to the entity responsible for issuing the token.
Wait, slow down. Generated, encoded, secret key? What does it even mean? I know this sounds like a lot, but just keep going, and everything will come together.
That being said, the signature ensures the integrity and authenticity of the token. It is the only thing that can be used to prove that the token can be trusted.
Token Claims
When we talked about the payload, we said that it consists of key-value pairs, also known as claims. Well, this is exactly what token claims are: key-value pairs that contain pieces of information about the subject that the token is issued for.
The payload must not include duplicate keys (claim names).
There are three types of JWT claims: registered claims, public claims, and private claims. None of the mentioned claims are mandatory or required in the payload.
Registered Claims
Registered claims are defined by JWT specification and have standardized meanings. These claims provide useful information for interoperability and common use cases. In total, there are 7 registered claims, as follows:
iss(Issuer): identifies the entity that issued the JWT.sub(Subject): represents the subject of the JWT, typically the user or client it belongs to.aud(Audience): identifies the recipients that the JWT is intended for.exp(Expiration Time): the expiration time on or after which the JWT should not be accepted anymore.nbf(Not Before): the time before which JWT must not be accepted.iat(Issued At): indicates the time at which the JWT was issued.jti(JWT ID): unique identifier for the JWT.
Using registered claims helps ensure consistency and understanding across different systems that consume JWTs. This is important when working with third-party services, for example.
Public Claims
Public claims are custom claims that are defined by developers. They are used to convey application-specific information and can vary based on the requirements of the system.
They should be registered with an appropriate authority or namespace to avoid conflicts. You can see a list of available public claims in the IANA JSON Web Token Claims Registry.
Public claims enable developers to include additional context or data within the JWT to support their application's specific needs.
Private Claims
Private claims are custom claims that are specific to a particular application or organization. They are usually not meant to be used or understood by other parties. Private claims allow developers to include proprietary or internal information within the JWT.
Private claims are useful for carrying application-specific data without worrying about potential conflicts.
This all might seem unnecessary, but keep in mind that there are a lot of big companies and services that rely on these claims and recommendations to be followed. They provide the necessary context for authentication, authorization, and any additional data required by the consumer.
Formats
Before we can continue further, you need to understand that JWT is just an abstraction built on top of already-existing industry standards. These standards are JWS (JSON Web Signature) and JWE (JSON Web Encryption).

This means that JWTs can be represented in two different formats: JWS or JWE. The information about which of these formats is used is presented in the JWT header.
Still remember this alg property in the header that defines which algorithm is used to secure the token? Well, it turns out that JWS and JWE have different algorithms. So, just by specifying the algorithm, you are also selecting the format itself.
JWS (JSON Web Signature)
JWS is by far the most common way to represent JWT. Also, in the rest of this article, we will focus only on JWT represented using JWS.
In JWS format, the token is signed using an encoded header, encoded payload, and secret key (password). This process will generate a JWT signature. The signature provides authenticity and integrity to the token.
Look at the payload that we had before.
1{
2  "name": "John Doe",
3  "moderator": true
4}
When a signature is created and a token is shared, this payload will be completely visible to everyone who gets the token.
You might ask yourself, why is this token useful when everyone can see its payload? The important thing is that you should not share any sensitive data in the payload. Even if a potential attacker gets his hands on the token, he will not be able to extract any meaningful information from the payload.
Obviously, JWS has its own advantages and disadvantages, but we will stop here, or this part might get too big very quickly.
JWE (JSON Web Encryption)
The payload of a JWE token is encrypted using a private key (asymmetric encryption), and only entities with the corresponding public key can decrypt and verify the token.
So, in practical terms, the JWT payload will be encrypted when using JWE format and completely visible when using JWS format.
JWE is useful when the payload contains sensitive information that should be kept confidential. But for most use cases, it is not required.
Remember, in this article, when we say JWT, it means JWT in the form of JWS. It is the most commonly used form and the one you will most likely encounter much more often.
How it works
We talked a lot about more theoretical and perhaps boring stuff. Let's switch our focus to what actually matters and explore how JWT actually works.
Like almost any token, it is important to consider how to generate, verify, revoke, and expire JWT. Let's start by exploring token generation.
Token Generation
Token generation describes the process of creating JWT. It usually involves a couple of steps that we will go through.
The first thing we need to do is define the payload for our token. It can literally be anything; depending on specific usage, different claims can be provided. The payload might look something like this:
1{
2  "name": "John Doe",
3  "iat": 1687716785,
4  "exp": 1741651200
5}
Notice that we added some registered claims like iat and exp, but not all of them. It is up to you to decide which claims to add.
With that out of the way, we need to consider which signing algorithm to use for our JWT. There are many types of algorithms available, but the most common are HS256 and RS256.
We will talk more about the HS256 and RS256 algorithms a little bit later.
For now, let's keep it simple and select HS256 as the signing algorithm for our JWT. With that decision out of the way, we can also create a header like this:
1{
2  "alg": "HS256",
3  "typ": "JWT"
4}
Next, we have to generate the signature. Remember, the signature is the part that actually ensures the integrity and authenticity of the token and is the only thing that can be used to prove that the token can be trusted.
To generate signature, we have to combine header and payload. But, there is one more thing we have to do before that. We can not just leave them in plain JSON format. After all, the token will be transferred via HTTP headers or URI query parameters and it has to be safe to use in such environments.
This is where base64url comes into play. It is basically the same encoding as base64, but it uses a URL and filename-safe alphabet making it perfect for applications where sharing via URL is important.
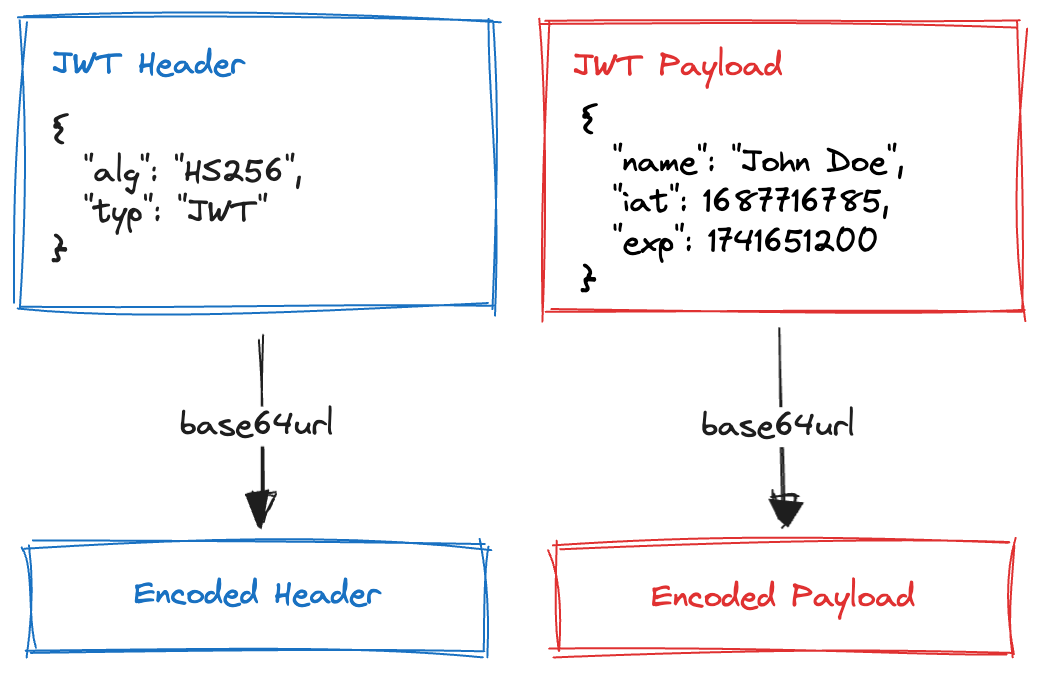
Header and payload first have to be converted to UTF-8 strings, which are basically a stringified version of the JSON format. This string can then be encoded using base64url, which will produce an encoded version of the header and payload.
We can now use the encoded header and payload to generate the signature. Here is where things could change a little bit. Depending on the algorithm specified in the header via the alg property, signature generation might be a little bit different.
Since we decided to use the HS256 algorithm, we have to provide the symmetric secret key. It is obviously important to choose a hard-to-guess sequence of characters. For our arbitrary example, let's just say that the secret key is the string super-secret.
A symmetric secret key is used both to sign the token and to verify it.
Finally, we can use the HS256 (HMAC-SHA256) cryptographic hash function to generate the signature. This function is already implemented for probably every language you can think of.
1HMACSHA256(
2  encoded_header + "." + encoded_payload,
3  "super-secret"
4)
The output of this operation is going to be our signature, also known as HMAC (Hash-Based Message Authentication Code), which is a form of digital signature. The generated signature also has to be base64url encoded.
Lastly, we have to create a compact version of the JWT. To do so, we need to combine the encoded header, payload, and signature separated by . (period) character.
1// base64url encoded JWT components
2header = "eyJhbGciOiJIUzI1NiIsInR5cCI6IkpXVCJ9"
3payload = "eyJuYW1lIjoiSm9obiBEb2UiLCJpYXQiOjE2ODc3MTY3ODUsImV4cCI6MTc0MTY1MTIwMH0"
4signature = "zrwE8dR_RbbkjKsxul-U8cL9FUcMjeCvOSnk6obd0Xo"
5
6// JWT
7token = header + "." + payload + "." + signature
As you can see, the final JWT is a string representation of the encoded header, payload, and signature. This compact form of the JWT is actually what we can use in our applications and APIs.
On the first glance, there might be a lot of moving parts and things we have to consider, but it is not that hard. If we put it all together into a single image, it might look something like this:
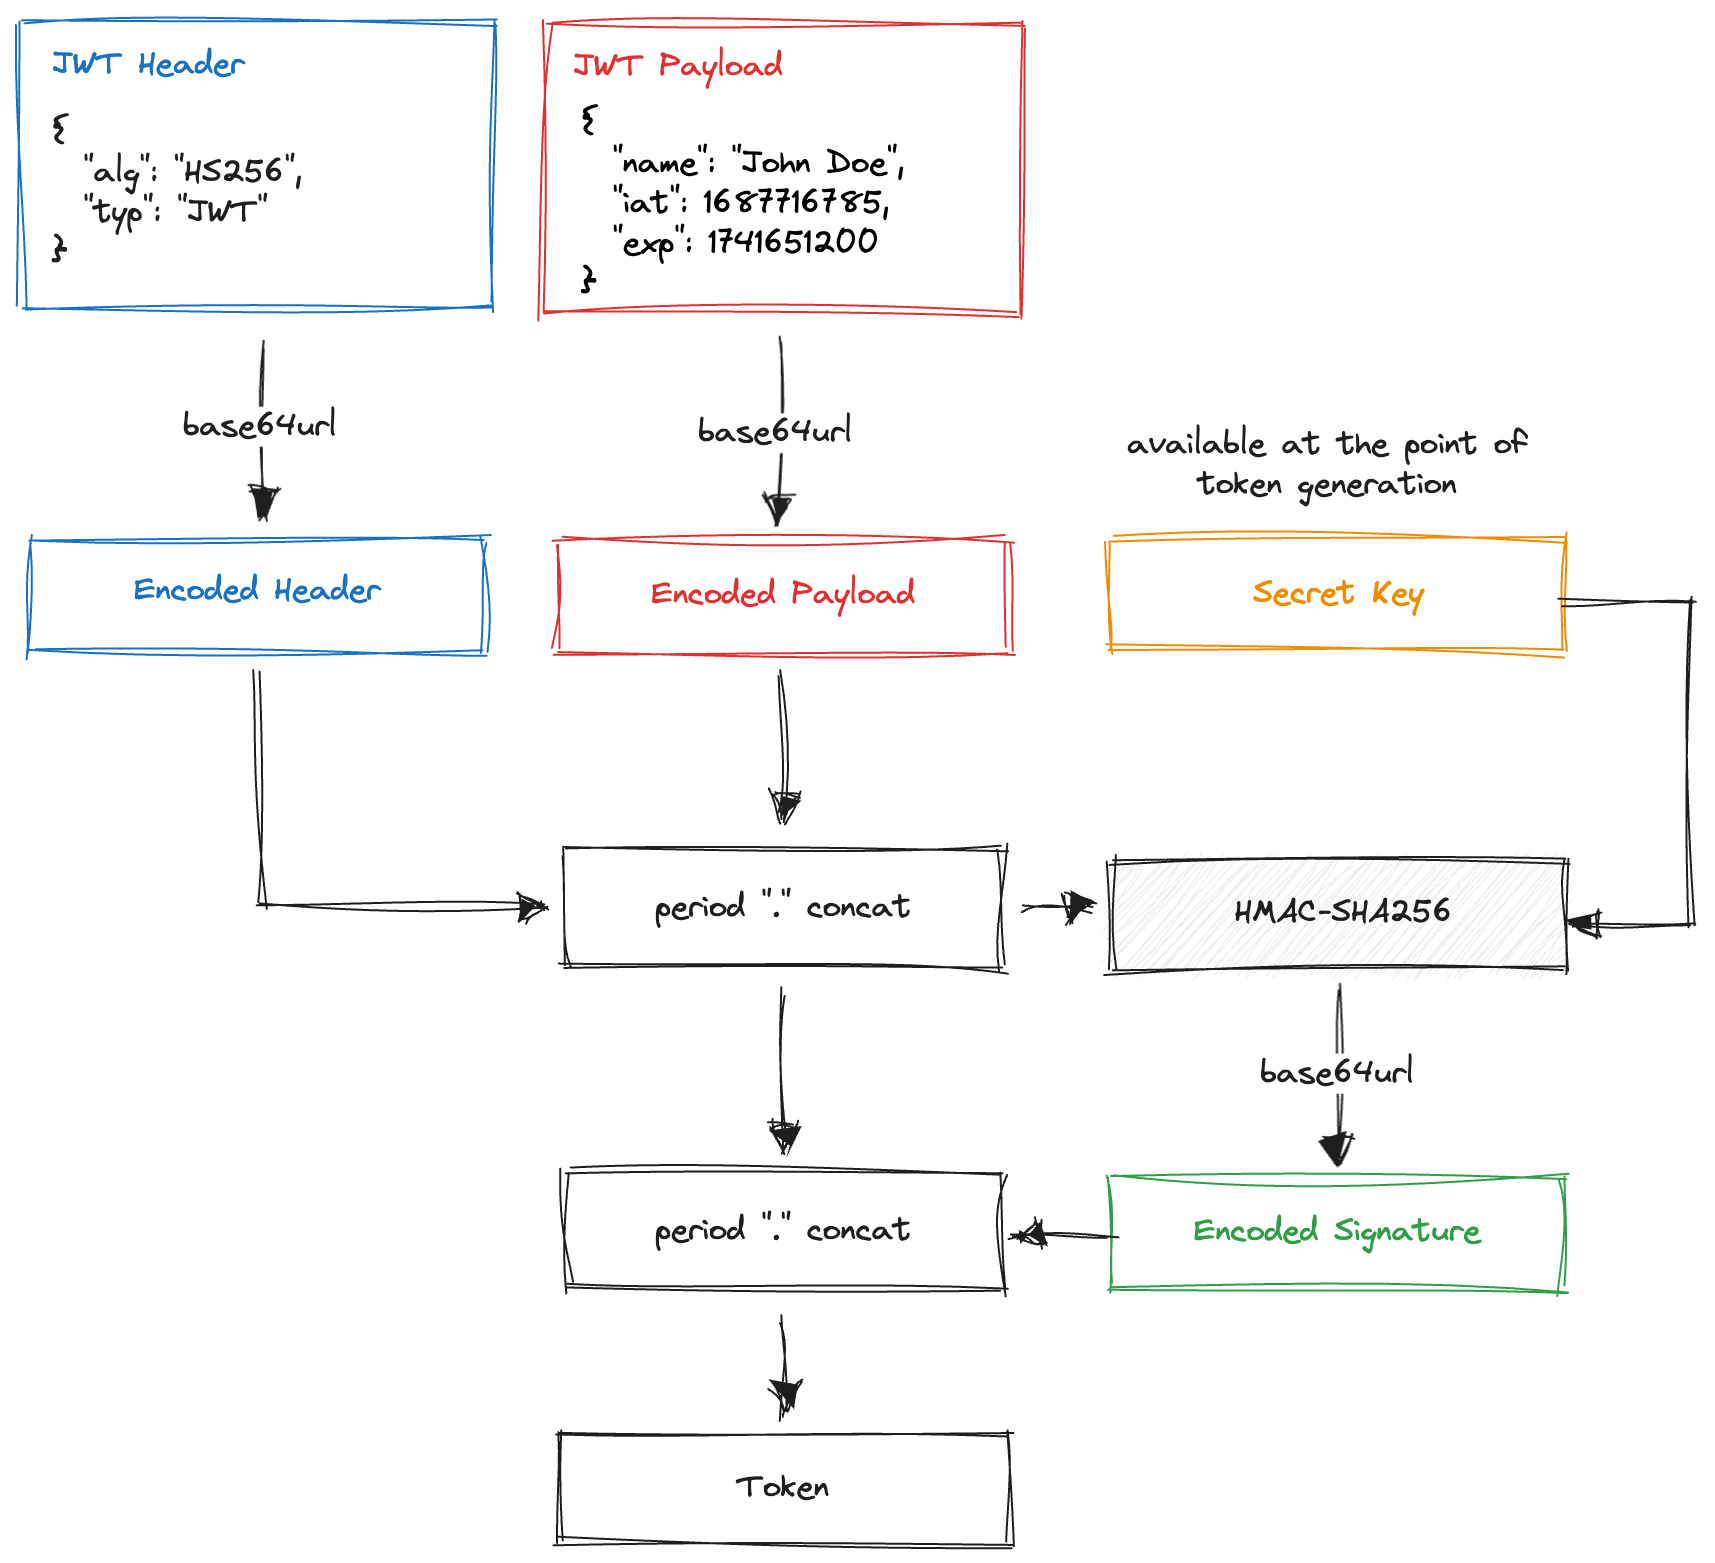
We have covered a lot of things just now. Take your time and read it again if something is not clear. Here are the most important things related to token generation:
- Prepare the token payload by adding the needed claims. Try to add as many registered claims as possible.
- Decide on which algorithm to use.
- Populate the token header by providing a minimum
algclaim. - Make sure to choose a strong secret key and keep it safe.
- Encode the header and payload using
base64urland concatenate them using a.period. - Create a token signature by running the HMAC-SHA256 hash function on the concatenated header and payload together with the secret key.
- Encode the token signature using
base64url. - Generate compact form by concatenating the encoded header, payload, and signature.
Keep in mind that token generation will be slightly different depending on the algorithm you choose to use. Here, we have used HMAC-SHA256 by specifying HS256 in the header alg property. We will talk more about HS256 and RS256 algorithms later in this guide.
Token Verification
It's time to explore the other end of the spectrum: token verification. Before we can verify the token, we need to know which algorithm was used to digitally sign it.
To do so, we can take the header part of the token and inspect the alg property. More often than not, we would know this information ahead of time since we could get it from the entity that generated the token. Anyway, we know that the algorithm used is actually HS256, which means that the token was signed using HMAC-SHA256.
The only way to confirm that the token can be trusted is to generate a control signature and compare it to the signature obtained from the token.
Remember, a token consists of an encoded header, payload, and signature separated by the . period character. As a reference, look at the token that we generated in the previous section:
1// Separated with a new line for an easier overview.
2eyJhbGciOiJIUzI1NiIsInR5cCI6IkpXVCJ9.
3eyJuYW1lIjoiSm9obiBEb2UiLCJpYXQiOjE2ODc3MTY3ODUsImV4cCI6MTc0MTY1MTIwMH0.
4zrwE8dR_RbbkjKsxul-U8cL9FUcMjeCvOSnk6obd0Xo
There is one more very important thing that we need to generate the signature: the secret key. The same secret key has to be used to generate and verify the token. Otherwise, the verification step would fail. So, when using HS256, you need to make sure that the secret key is available at the point where the token is generated and at the point where the token is verified.
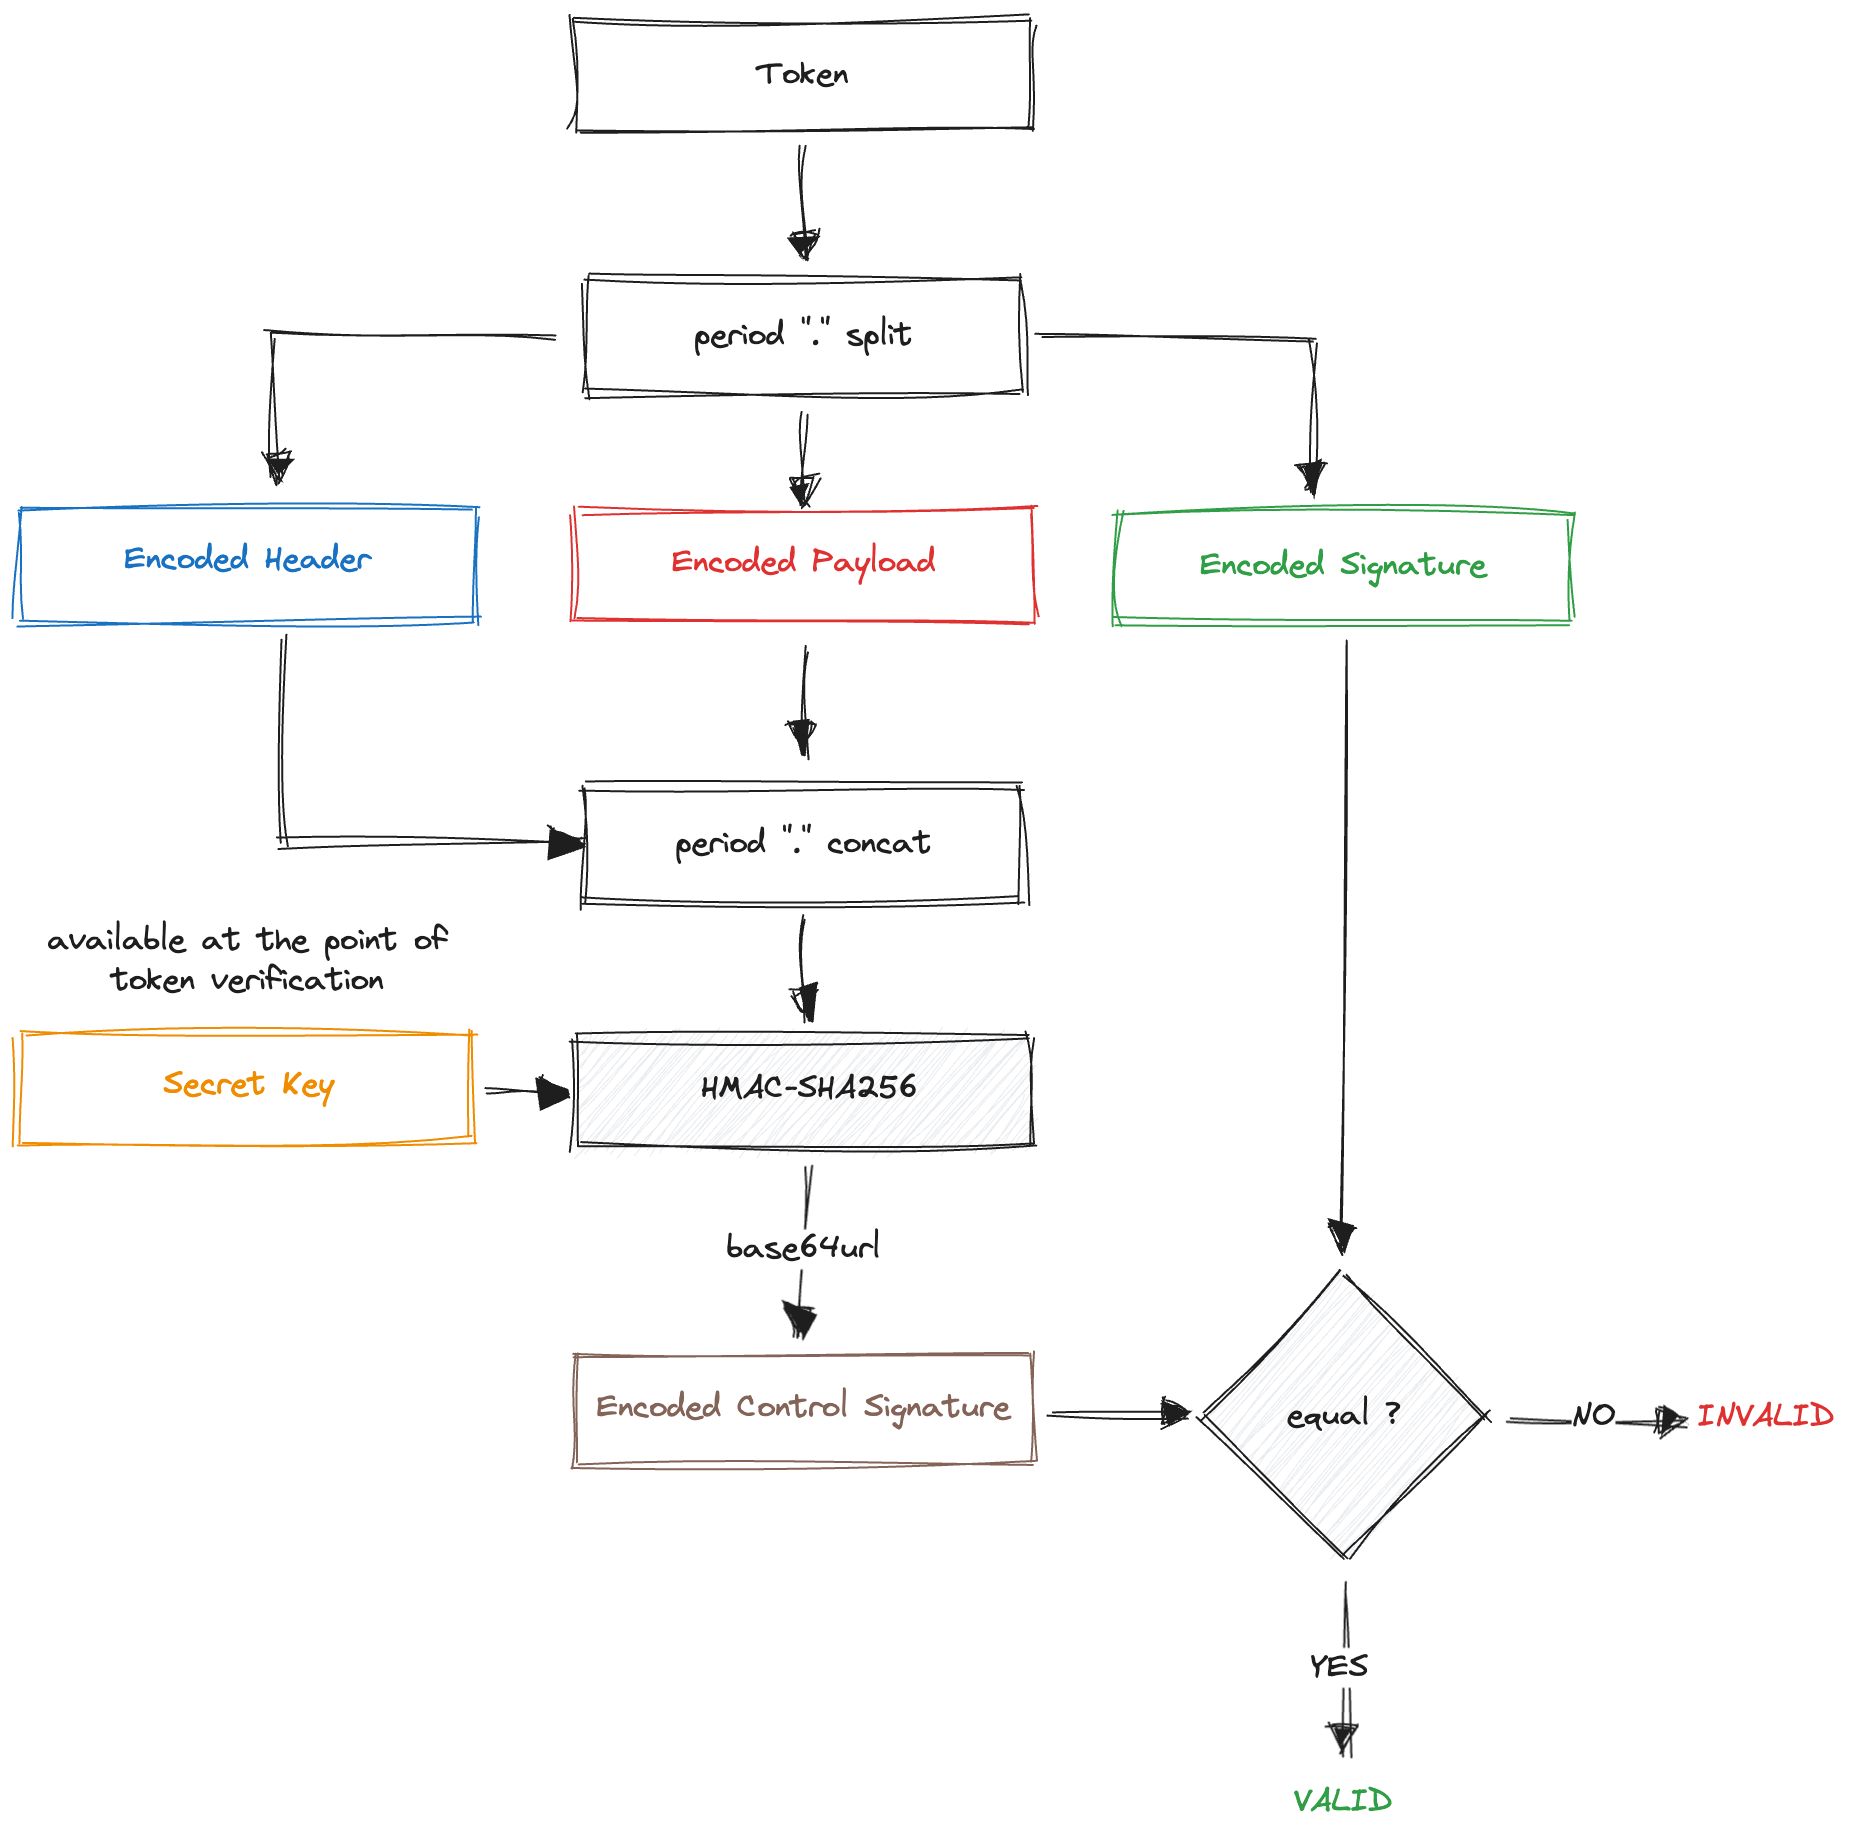
Now that we have all the required data, we can finally verify the token. First, we split the token into three components: the encoded header, encoded payload, and encoded signature. Next, we concatenate the encoded header and encoded payload using . period.
The resulting string is taken and passed to HMAC-SHA256 together with the secret key to generate the control signature. We also need to make sure that the control signature is encoded using base64url.
Finally, we can compare the control signature with the signature from the token and check if they are an exact match. If they are the same, we know that the token can be trusted and that no one has tried to change its payload. If the signatures do not match, the token is invalid, and someone has tried to compromise it.
It is also important to check the claims provided in the payload. To do so, we first have to decode the payload using the revers action of base64url. Depending on the requirements, token claims can be used to further fine-tune the verification process by ensuring that they meet the required criteria.
Token Expiration
JWTs can have a limited lifespan to enhance security and mitigate the risks associated with long-lived tokens. It is very important to create tokens in such a way that they can expire. If expiration time is not taken into consideration, in theory, tokens could be valid indefinitely.
Every JWT should include an expiration time provided via the exp claim, which indicates the timestamp after which the token is considered invalid.
However, just adding an exp claim is not enough. The token verification strategy also needs to be implemented in such a way that the exp claim is always checked. All expired tokens should be rejected, no matter what.
Token Revocation
We just talked about expiration and the exp claim, but it cannot help us in all situations. What happens if we lose or leak a valid token that has not yet expired? Anyone in token possession could use it to access restricted resources. This is where revocation and revocation strategies come into play.
Token revocation is a big issue for JWT since they are stateless. This means the token itself holds all the data necessary for its verification. The entity that created the token does not need to keep any token-related state. So, whenever a token is lost, it will continue to be valid until it expires.
What can we do to invalidate these tokens? The common way to do it is to create some kind of storage for revoked tokens. This storage should always be checked during token verification. If the token is found in the storage, it should be marked as revoked, and access should be denied.
With this approach, a token does not have to expire to become invalid. As soon as it's added to the list of revoked tokens, it is basically useless since its verification will fail.
There are also different strategies to manage the revocation process, but that is not the topic of this article. If you are curious, I encourage you to explore it on your own.
HS256 Algorithm
As we have said many times before, the security of JWT mainly depends on the type of algorithm we choose to use. So, let's check out HS256 in more detail.
HS256, which stands for HMAC-SHA256, is one of the popular signing algorithms used in JWT. HMAC (Hash-based Message Authentication Code) is a symmetric cryptographic algorithm that uses a shared secret key to generate a hash-based MAC (Message Authentication Code), also known as HMAC. Using a shared key means that the same key has to be used to sign and verify the token.
We have already talked about signature generation and verification using the HS256 algorithm.
I will not go into details about how this algorithm generates a token signature. If you want to know how it works under the hood, read about HMAC, hashing functions, and SHA-256. They all play a role here.
Pros
HS256 is computationally efficient and performs well in terms of generating and verifying signatures. The algorithm is relatively fast and can handle a high volume of token operations.
Implementing HS256 is straightforward and simple. It only requires a shared secret key between the issuer and the recipient.
I would like to add more pros, but realistically, compared to RS256, there are not many left on the table. That being said, HS256 is still a fine algorithm to use if we take special care about the cons.
Cons
Even if it seems like an impossible task, HS256 signatures can still be brute-forced. This mostly happens if the chosen secret key is weak and easily guessable.
Maybe the biggest weakness is the existence of a symmetric secret key that has to be shared between issuer and receiver and any other entity that is using JWT. This comes with a lot of issues related to the management of secret keys and token revocation.
The secret key contributes to the difficult key rotation. Key rotation requires the secret key to be changed on every entity that is using JWT. It becomes increasingly hard and error-prone based on the number of entities relying on the secret key, as you have to update the secret key for each one of them.
Another issue is the lack of separation between token generation and token verification. When using HS256, every entity can both generate and verify a token, and those actions cannot be separated. This increases the chances of a secret key being stolen since there are just more places where it could happen.
I think you get the point. In the long run and in more complex systems, HS256 can cause some really serious security concerns. Luckily for us, RS256 can solve all these problems.
RS256 Algorithm
RS256, which stands for RSA-SHA256, is another widely used algorithm for signing JWTs. RS256 is based on asymmetric cryptography, utilizing a key pair consisting of a private key for signing and a corresponding public key for verification.
I know there are a lot of different things going on: RSA, SHA256, cryptography, private and public keys. What is all of that?
Well, let's say that many smart people have come together to improve the security of the Internet. This is how we got all of these concepts, algorithms, and implementations. They are by no means only used in JWT but rather in many different applications, but that is a topic for another time.
To keep it concise, we will explore how RS256 works at a higher level. We will not go into too many details, but it will be just enough for you to grasp the concept.
At the end, we only need this digital signature for our token, so we can assume that the final product of the RS256 algorithm is just that: a digital signature that we can append to our token.
RSA encryption
As RS256 uses the RSA asymmetric cryptography algorithm and RSA keys, we have to talk about them a little bit. This will be a very short introduction to RSA encryption, and I encourage you to explore more.
RSA uses a key pair consisting of two correlated keys: private and public. A private key should always be kept in a safe place and should only be used for encryption. A public key can be shared with anyone and should only be used for decryption.
So what the private key encrypts, the correlated public key is able to decrypt. This is very important, as it allows the private key to stay safe since it's not required for decryption. Let's examine how it translates to the process of generating JWT signatures.
JWT signature generation
We said before that, depending on the chosen algorithm, the process of generating a signature might be slightly different. It's time to explore what it looks like for RS256.
First, we need an RSA key pair. Since RSA is a very common and widely used algorithm, there is an official implementation of it in every common programming language. So we do not have to write it from scratch but rather use the existing implementation to generate the key pair. For now, let's assume that we have the needed key pair.
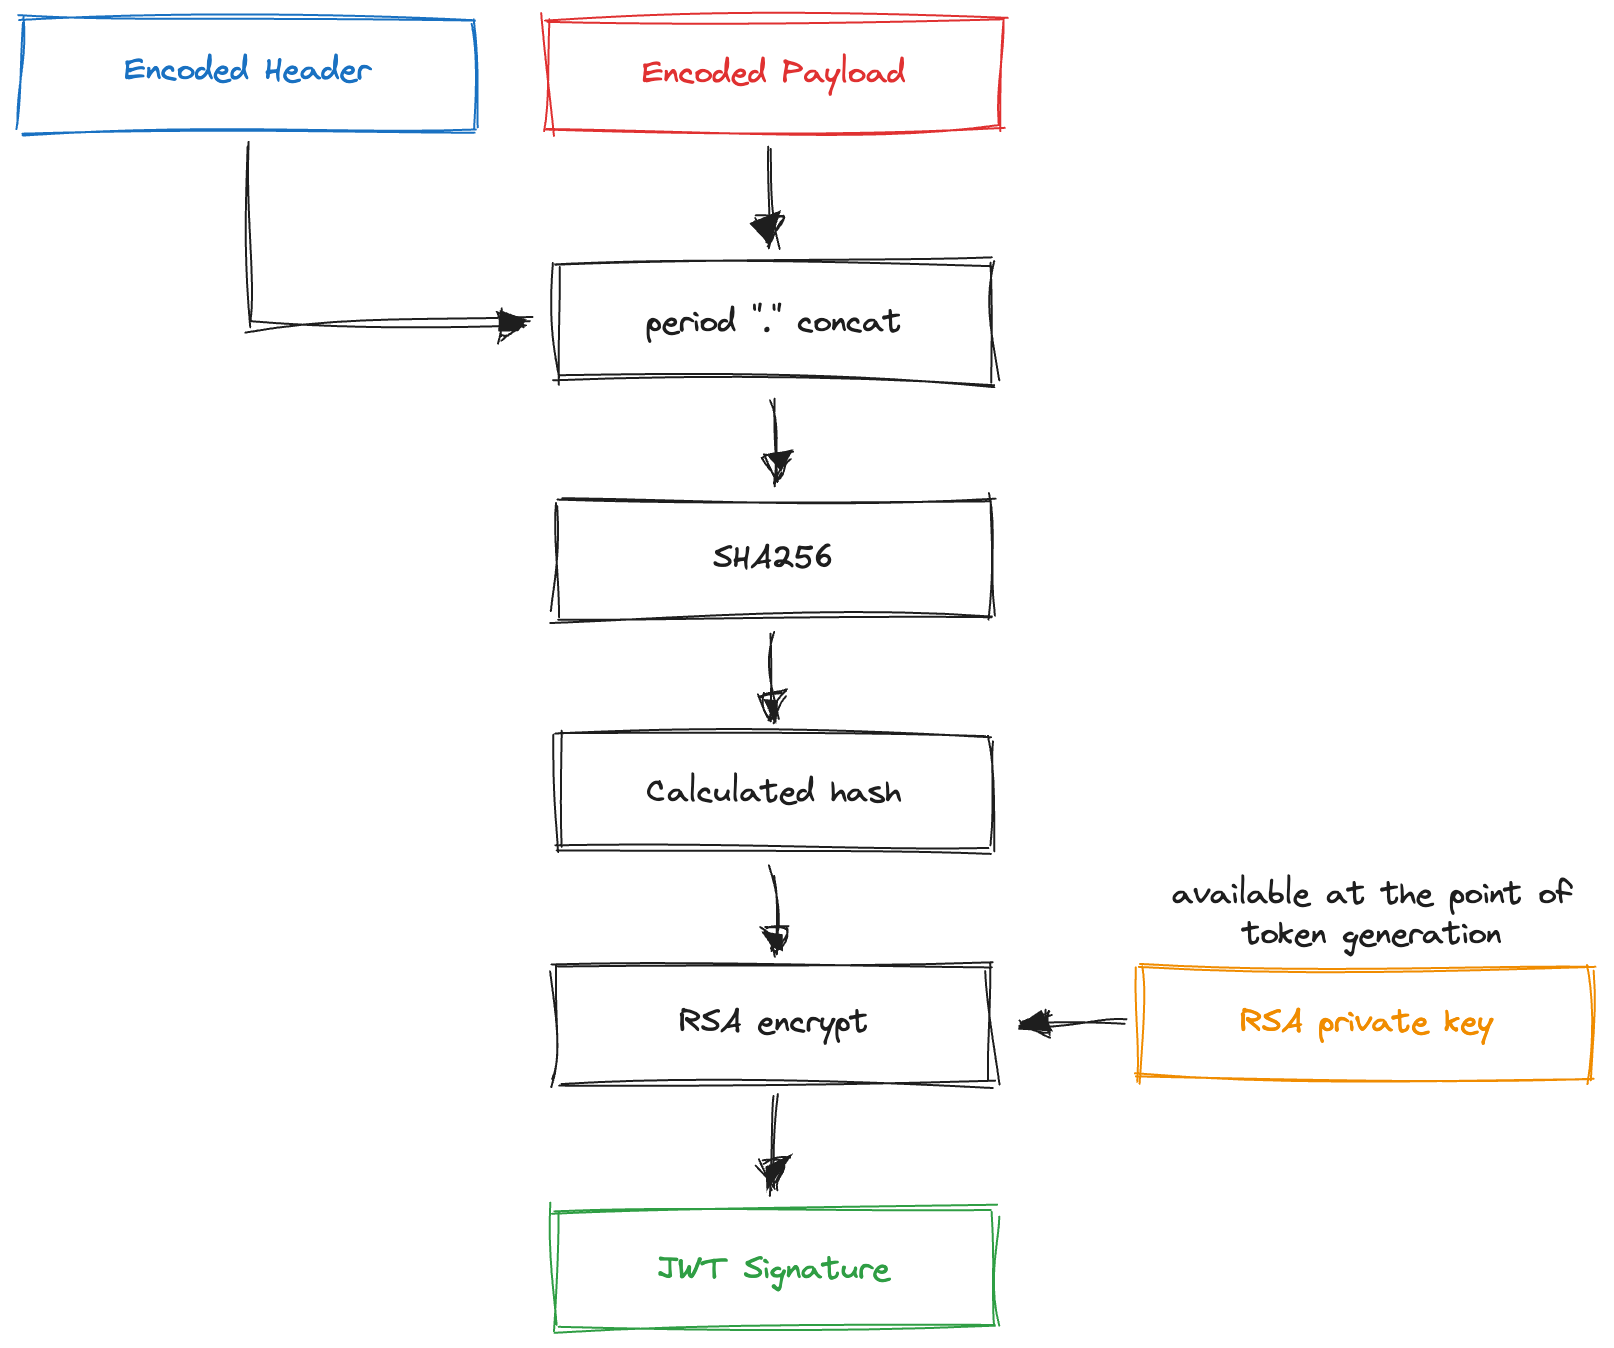
We can take an encoded header and encoded payload and hash them using SHA256. The output of this hashing function is by no means secure. It can be easily recreated by the attacker using the same header and payload taken from the token itself.
To make it secure, we have to take the hash output and encrypt it using the RSA private key. This will produce an RS256 digital signature. Before adding it to the token, the generated digital signature needs to be encoded using base64url.
JWT signature verification
When doing verification of the RS256 signature, we cannot generate exactly the same signature as we could for the HS256 algorithm. For that, we would need to have a private key, which should only be available to the entity that generates the token.
Instead, we can use a public key, available at the point of verification, to help us determine if the signature is valid.
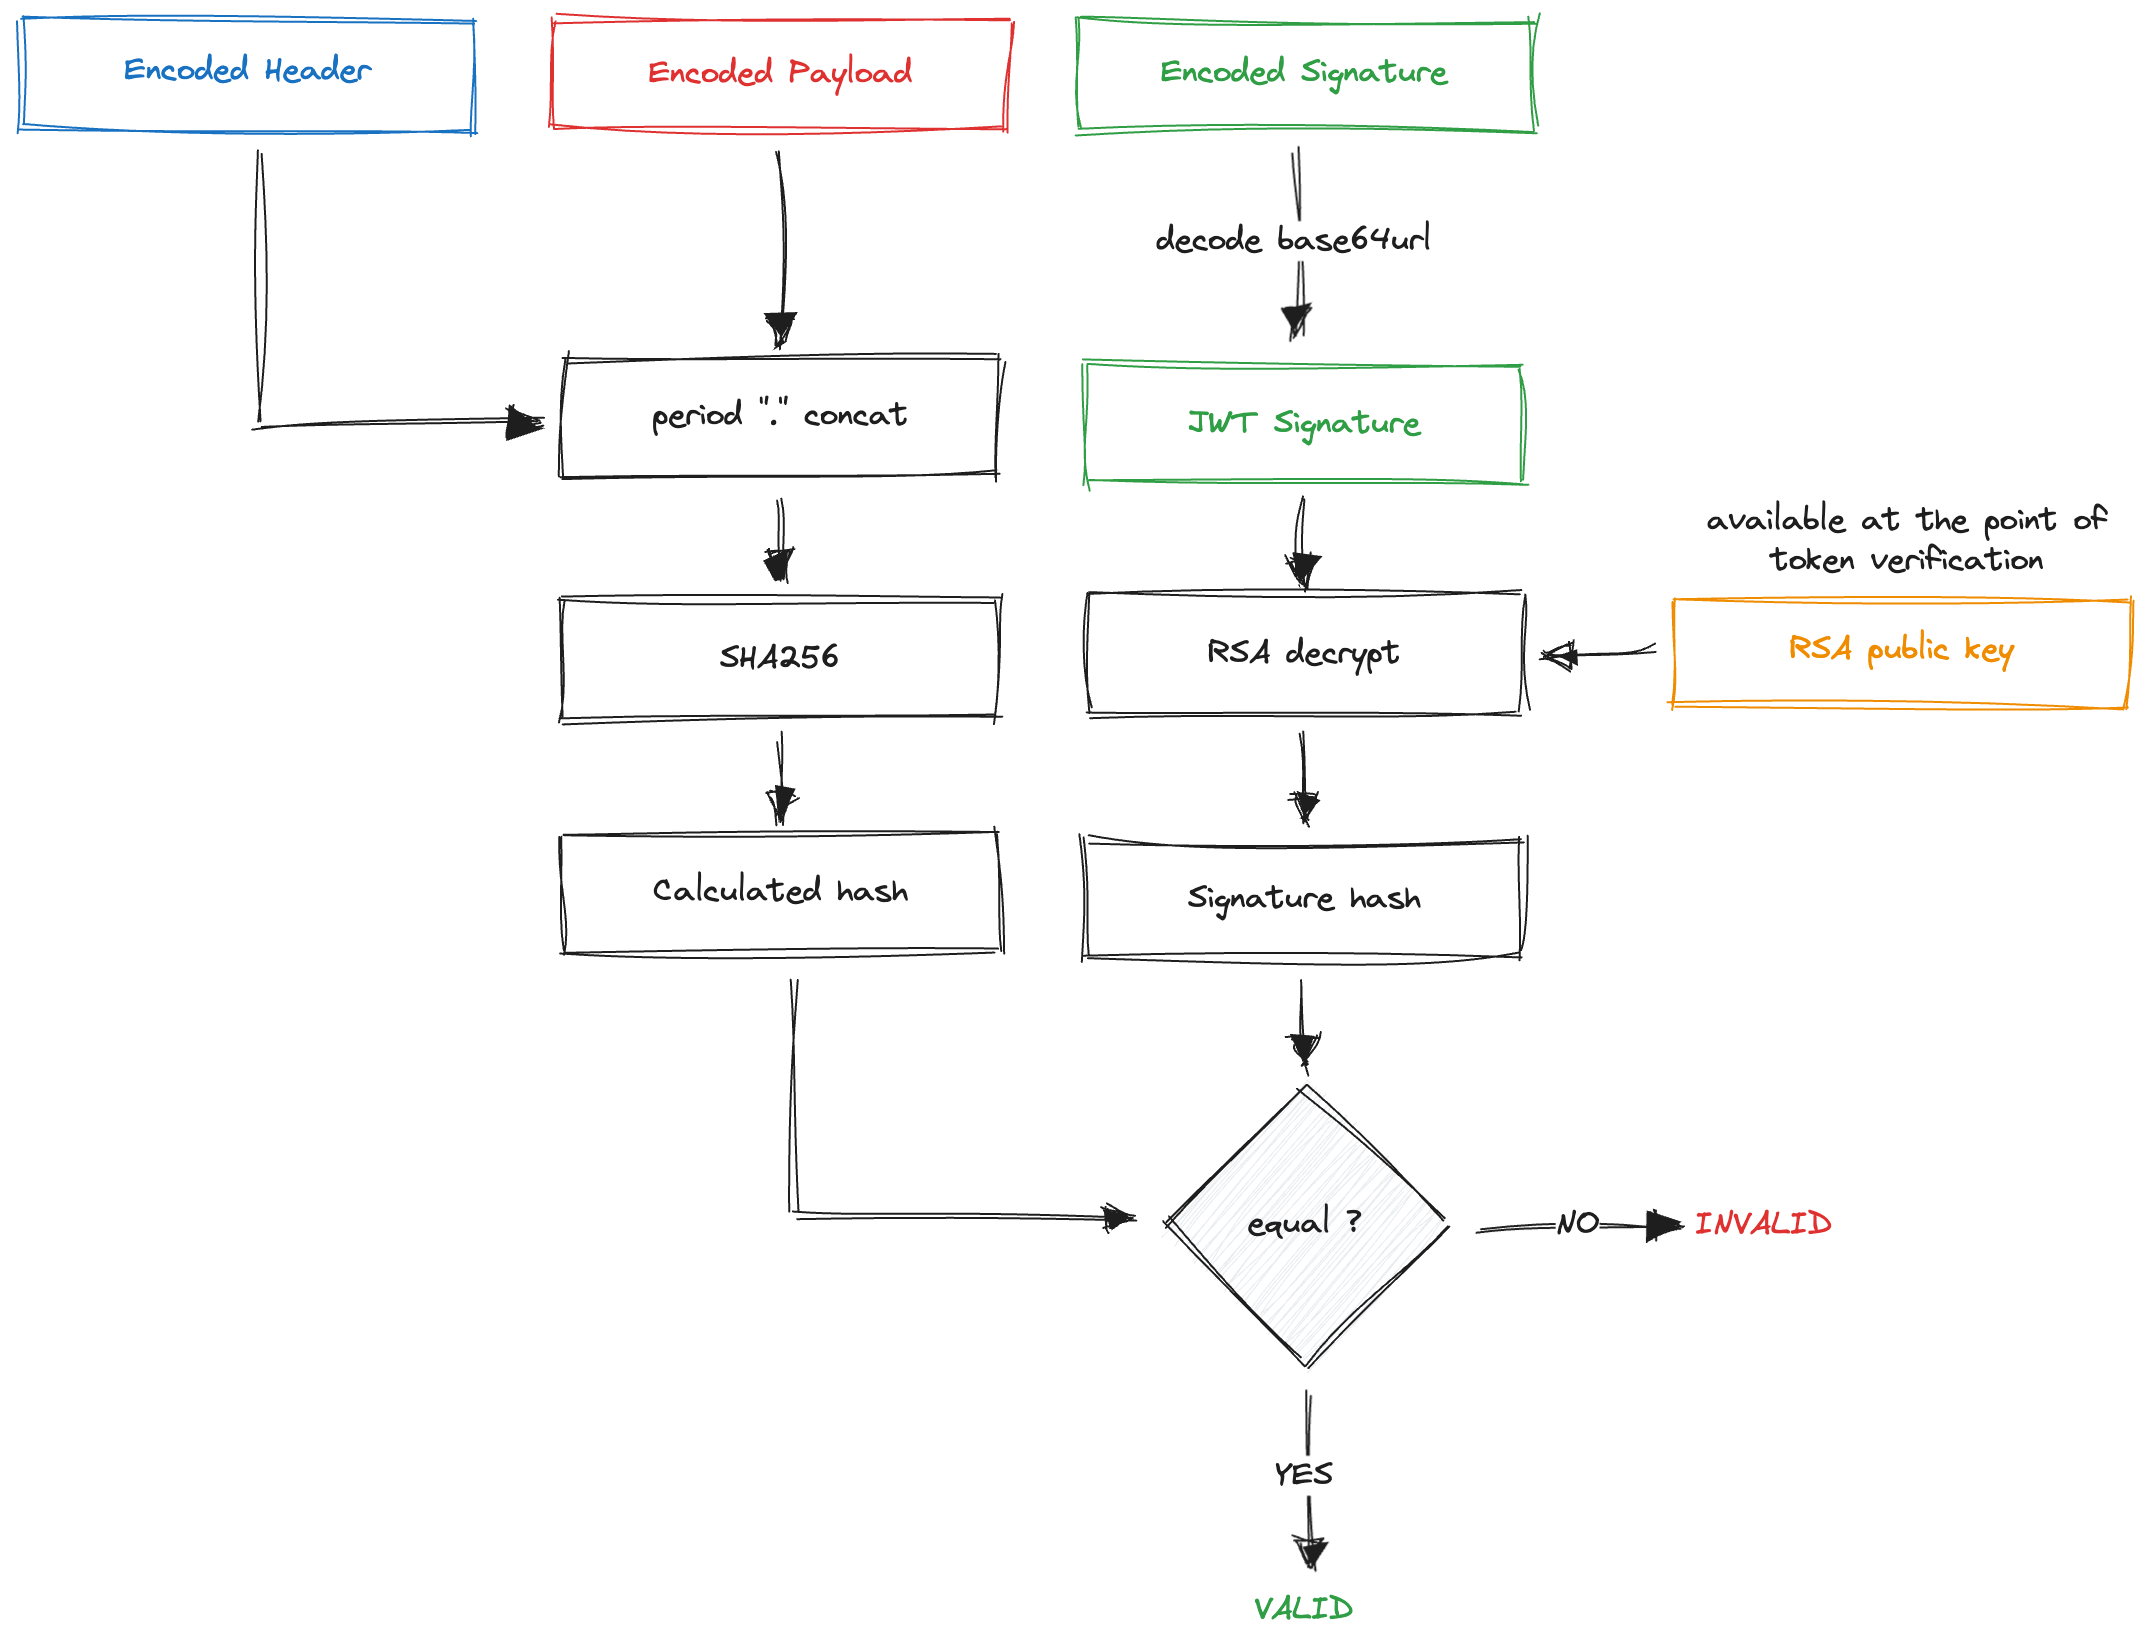
We first need to take the encoded header and encoded payload, concatenate them with a . period, and pass the result to the SHA256 hashing function to generate the hash.
Do you still remember what we can do with the public key? That's right, we can take the signature from the token, decode it, and decrypt it using the public key. As a result, we will get the original signature hash.
Now we can compare our generated hash with the hash from the signature. If they are the same, we can conclude that the signature is valid and can be trusted.
Anyone could have calculated that hash, but the decryption process to get the original signature hash from the token would only work if the token signature was encrypted with the matching RSA private key.
Pros
As you might have noticed already, RS256 provides higher security and resistance to brute-force attacks. This makes it probably impossible for attackers to forge signatures.
Compared to HS256, there is an added RSA private and public key pair, one for encrypting and one for decrypting data. This eliminates the need for a shared secret key, which caused a lot of security concerns with the HS256 algorithm.
Relatively simple key rotations can be executed using RS256. If the private key is compromised, a new RSA key pair can be quickly created, and the public key can be distributed immediately to all relevant entities.
One nice side effect of using a public and private key pair is that it provides great separation of concerns. With RS256, the private key should only be available to the entity that handles token generation, while the public key is available to the entity that has to perform token verification. This greatly increases security by reducing the exposure of private keys.
Cons
There is not much bad going on with the RS256 algorithm. However, if we want to be nitpicky, there are some things to consider.
Using RS256 can introduce computational complexity since it involves operations like encryption and decryption, which can be resource-intensive when dealing with long messages. But this is also not a major concern since it is only required to encrypt or decrypt the signature hash, not the whole token.
Some might say that key management could cause some concerns related to the secure generation, storage, and distribution of RSA key pairs. I think it's a valid point, but as with any credentials, you have to proceed with care and be aware of related risks.
As a last note, compared to HS256, we could say that it is marginally harder to implement JWT using RS256, mainly because of asymmetric cryptography and RSA key pairs.
Benefits of JWT
After reading all of this, it might still not be clear what the benefits of JWT are compared to other forms of authentication. JWT has gained widespread popularity as a secure and efficient method for transmitting data between parties because of the benefits it provides, so let's explore some of them.
- Industry standard
JWT was created as an industry standard, which further encourages its usage. Being an industry standard ensures interoperability across different platforms, programming languages, and frameworks. Developers can confidently implement JWT-based solutions, knowing that they will work seamlessly across different technologies. - Compact
The less data you send over the Internet, the better. JWT fits nicely because of its compact form. When encoded, it can easily be sent via URL query parameters or HTTP Headers. - Strong security
Tokens are digitally signed, which prevents attackers from modifying token content. Depending on the algorithm used in signature creation, asymmetric keys can be used to further improve security. - Stateless
The token itself contains all the data necessary for it to be verified, which means that the server doesn't need to store any session information. This eliminates the need for server-side session management and improves scalability. - Single Sign-On (SSO) capable
JWT is widely used in SSO systems. Once a user logs in and receives a JWT, they can use the same token to access multiple applications or services without the need for separate authentication. This seamless user experience simplifies the login process and enhances user productivity. - Customizable
JWT supports custom claims, allowing for the inclusion of additional information relevant to the application's specific requirements. These custom claims can be used to convey application-specific data, user preferences, or any other necessary information.
I hope you can grasp why JWT is so popular and widely used by looking at the listed benefits. With all of its benefits, JWT is challenging other forms of authentication and authorization and gaining ever-growing support.
JWT and Authentication
We know by now that JWT can be used for user authentication, but how exactly does that work? Depending on the application requirements, there are different ways to implement user authentication.
This section will include code snippets written in JavaScript. Node, the JavaScript runtime, can be used to run the snippets.
Let's assume that we want to set up user authentication for our application. We will have the authentication server responsible for authenticating users and generating JWTs, and the application server that will verify JWT and handle requests from the application client.
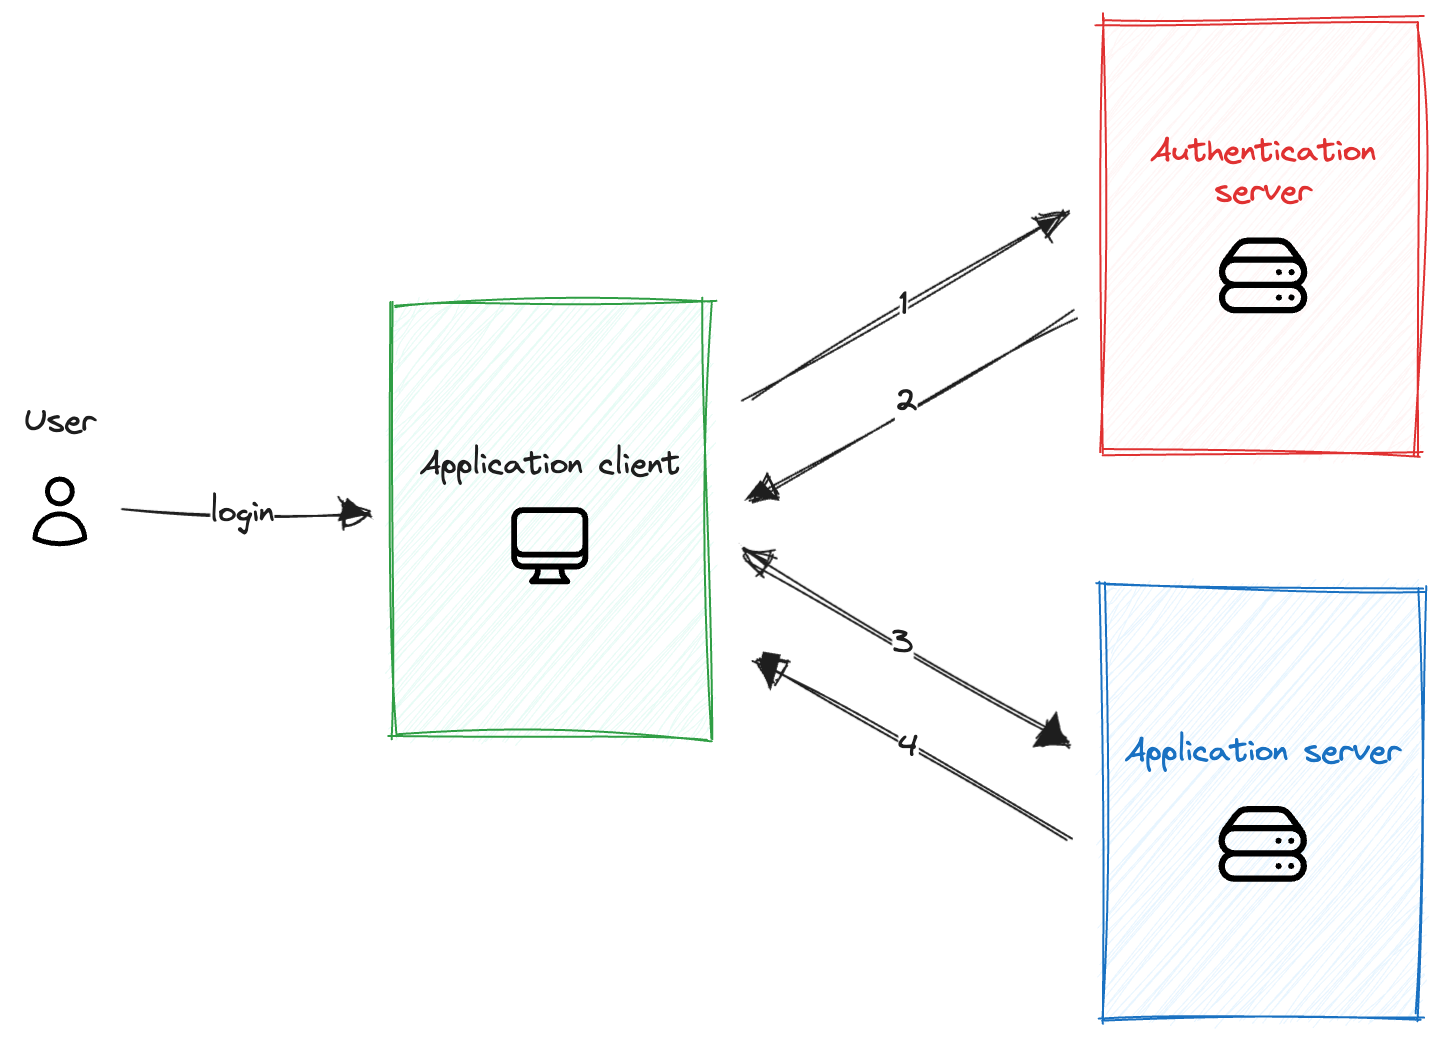
In the image above, you can see the basic authentication flow for our application. The application client represents the user interface for our application. It can be a website or mobile app. The user wants to authenticate with our application and goes to the login page.
The application client will ask for the user's credentials, like email/username, and password. When the user enters the credentials, the following authentication flow will be initialized:
- The application client will take the credentials and send them to the authentication server in the body of an HTTP Post request via a secure HTTPS connection.
- The authentication server takes the credentials and checks if the user with the provided credentials exists. If the user is found, the authentication server will generate a JWT and return it as a response to the request.
- The application client now holds JWT specific to the user and can use it to access protected resources on behalf of the user. It will now redirect the user to the main page of the application and make a new HTTP GET request with the token provided via the HTTP Authorization header on the application server.
- The application server will take the token provided via the Authorization header and verify its signature and claims. If the token is valid, the application server will return user-specific data to the application client.
It is very easy to split the authentication server from our application server when using JWT. This is why we can outsource the authentication part to third-party services like Clerk, Auth0, or any other provider. This allows us to focus on the business logic of our application, which is handled by the application server.
Now that we understand how the authentication flow works, we will focus on the authentication server, which is responsible for generating JWT.
Our goal here is to point out important parts related to JWT generation and verification. We are not going to write server or business logic implementations.
Authentication server
We already said that the authentication server is used to authenticate the user and generate JWT, which can be used by the application client to access restricted resources on the application server.
Before handling the requests from the application client, we have to prepare all the necessary data required for token generation. The first thing we need to do is decide which algorithm to use for signing JWT signatures. Based on the listed benefits we saw before, I think it is safe to say that the RS256 algorithm would be a better option than the HS256 algorithm.
I hope you still remember how RS256 works. Since it uses RSA encryption, we have to generate an RSA key pair: a private and public key. There are many ways to do this, but since we will work with Node, it is also fitting to generate RSA keys using Node.
1import fs from 'fs';
2import crypto from 'crypto';
3
4const KEYS_DIR_PATH = './keys';
5
6function generateKeyPair() {
7  const { publicKey, privateKey } = crypto.generateKeyPairSync('rsa', {
8    modulusLength: 2048,
9    publicKeyEncoding: {
10      type: 'spki',
11      format: 'pem'
12    },
13    privateKeyEncoding: {
14      type: 'pkcs8',
15      format: 'pem'
16    }
17  });
18
19  return { publicKey, privateKey };
20}
21
22const { publicKey, privateKey } = generateKeyPair();
23
24if (!fs.existsSync(KEYS_DIR_PATH)) {
25  fs.mkdirSync(KEYS_DIR_PATH)
26}
27
28fs.writeFileSync('./keys/private.pem', privateKey);
29fs.writeFileSync('./keys/public.pem', publicKey);
This simple script can be used to generate the required RSA keys. It uses Node's native crypto module to generate the keys. When keys are generated, we just save them in the destination directory under the specified name. Private and public keys are saved in keys/private.pem and keys/public.pem files, respectively. With the groundwork done, we can switch to the more exciting topic of generating the JWT.
In our example, the authentication server will receive an HTTP POST request with credentials provided in the request's body. The authentication server needs to extract the credentials (username and password) and query the database to check if the user with the provided credentials exists. At this point, the server has retrieved user data and roles, and we can already define JWT payloads using user data.
1const JWT_PAYLOAD = {
2  /**
3   * Custom claims.
4   * This can be anything, depending on the use-case you have.
5   */
6  name: "John Doe",
7  role: "EDITOR",
8
9  /**
10   * Registered claims.
11   */
12  sub: "22334455",
13  iat: Math.floor(Date.now() / 1000),
14  exp: Math.floor(Date.now() / 1000) + (3 * 24 * 60 * 60),
15  iss: "Authentication server (NO.1)",
16}
Now we have a JWT_PAYLOAD that holds data related to the user. You can notice that we have provided a couple of registered claims; we have talked about them in previous sections. Probably the most important one is exp, which says that the token will expire in 3 days. For iat and exp, we have to use the Unix timestamp format.
Other than registered claims, we also have a couple of custom claims. Here, we have the option to specify the claim name and claim value. Those claims are application-specific, and we can provide as much as we like. But be careful; those claims are visible to everyone, so they should not contain sensitive data.
With the payload ready, we need to prepare the header. We already know which algorithm to use, so the header for our token will look like this:
1const JWT_HEADER = {
2  alg: "RS256",
3  typ: "JWT"
4}
The next step is to create a JWT signature. For this part, we can use already-existing npm packages. You might ask, Why use npm packages? The answer is quite simple. This algorithm is complex and hard to implement; it is much faster and more secure to rely on a well-tested package maintained by a lot of smart people.
In this case, I decided to use the jose npm package. It is well maintained, supports all JWT use-cases, and has a nice growing community of supporters. To use it, we first need to install the package by running the following command:
1npm install joseThis module provides a lot of useful functions and utilities, but we will focus only on a couple of them. You can read more about the module itself if you feel like it.
Before using any utilities provided by the module, we have to import the RSA private key. This key will be used for signing the signature hash.
1const PRIVATE_KEY = fs.readFileSync('./keys/private.pem', { encoding: 'utf-8' })
2const runtimePrivateKey = await jose.importPKCS8(PRIVATE_KEY, JWT_HEADER.alg)
We just have to read the content of the ./keys/private.pem file and save it into PRIVATE_KEY const. Before the jose module can use it, we have to make a runtime-specific private key using the importPKCS8 function and save it into the runtimePrivateKey const.
When the runtime-specific private key is ready, we can generate the final token in its compact form using the sign method on the instance of the SignJWT class.
1const generatedToken = await new jose.SignJWT(JWT_PAYLOAD)
2  .setProtectedHeader(JWT_HEADER)
3  .sign(runtimePrivateKey)
You might think, What just happened? We did not encode the payload and header or take any intermediate steps, as described in previous sections. Well, simply put, the jose module did it for us; in fact, all the following things are covered by the module:
- Convert the
JWT_PAYLOADobject into the stringified version and encode it usingbase64url. - Convert the
JWT_HEADERobject into the stringified version and encode it usingbase64url. - Generate the signature using the encoded header, encoded payload, and RSA private key.
- Encode the JWT signature using
base64url. - Concatenate the encoded header, encoded payload, and encoded signature with a
.period and produce a compact form of the token.
I hope you can see value in using the jose module here. It took care of all things related to token generation. At the end, we got the final token just by using a simple API. If we log the value of generatedToken, it looks something like this:
1// Separated with a new line for an easier overview
2eyJhbGciOiJSUzI1NiIsInR5cCI6IkpXVCJ9.
3eyJuYW1lIjoiSm9obiBEb2UiLCJyb2xlIjoiRURJVE9SIiwic3ViIjoiMjIzMzQ0NTUiLCJpYXQiOjE2ODk0MDcxMDYsImV4cCI6MTY4OTY2NjMwNiwiaXNzIjoiQXV0aGVudGljYXRpb24gc2VydmVyIChOTy4xKSJ9.
4v9LXLIjGPtakpRvGPYYDvPyyQ1avxmJW2zlJ4ND_74YIPbloZBPGtJ3gMCjY40m5Qbf1jy7xv-jIphLOi2EBYNW4EUIGqZb3Lj0Tn4W_hZiL9tq1ASUma4nURVPREeDGpD_B5AojIjk-iiLc_K3Iin8kwG3u5L3RDU9zLOEdW2TUPwR-Q4NNm8kG_9OBoA2z0H6Uknk4Udv6VL0EuKKds1OXgsHAK9vRi-psGISB0W1AGHjegPFJXotcXW2DOBHKAUm-NTwcpPt0YMzNLmTLpfwzsqYyHJxwneQW-KQOTpBNpIUuWVh3qyJumyVk10hHLMlr8lOeHL_KjmH1vupOVA
Now, the authentication server can return the token to the application client as a response to the initial request. The application client can use the token to request protected data from the application server.
Application server
It's time to focus on the application server. This is where we need to handle token verification. Again, let's start with what we already know. First of all, we need access to the public key, and we also know that the algorithm used to sign the token was RS256.
As a side node, we could have gotten the information about the algorithm used from the header itself, as it is visible the same as the payload.
1const PUBLIC_KEY = fs.readFileSync('./keys/public.pem', { encoding: 'utf-8' })
2const SIGNATURE_ALGORITHM = 'RS256'
We just took those values and saved them into the PUBLIC_KEY and SIGNATURE_ALGORITHM const. You need to make sure that the public key is correlated, part of the same RSA key pair, to the private key used to sign the token.
The application client will make an HTTP GET request to one of the endpoints on our application server. This request will also include the token provided via the HTTP Authorization header.
The application server has to extract the token from the Authorization header so it can be verified. The token received from the header might look like this:
1// Separated with a new line for an easier overview
2eyJhbGciOiJSUzI1NiIsInR5cCI6IkpXVCJ9.
3eyJuYW1lIjoiSm9obiBEb2UiLCJyb2xlIjoiRURJVE9SIiwic3ViIjoiMjIzMzQ0NTUiLCJpYXQiOjE2ODk0MDcxMDYsImV4cCI6MTY4OTY2NjMwNiwiaXNzIjoiQXV0aGVudGljYXRpb24gc2VydmVyIChOTy4xKSJ9.
4v9LXLIjGPtakpRvGPYYDvPyyQ1avxmJW2zlJ4ND_74YIPbloZBPGtJ3gMCjY40m5Qbf1jy7xv-jIphLOi2EBYNW4EUIGqZb3Lj0Tn4W_hZiL9tq1ASUma4nURVPREeDGpD_B5AojIjk-iiLc_K3Iin8kwG3u5L3RDU9zLOEdW2TUPwR-Q4NNm8kG_9OBoA2z0H6Uknk4Udv6VL0EuKKds1OXgsHAK9vRi-psGISB0W1AGHjegPFJXotcXW2DOBHKAUm-NTwcpPt0YMzNLmTLpfwzsqYyHJxwneQW-KQOTpBNpIUuWVh3qyJumyVk10hHLMlr8lOeHL_KjmH1vupOVA
It is the same token that we generated previously. When the token is extracted, it has to be verified to confirm that the user is legit. Again, we will use the jose module to help us with this process.
1const runtimePublicKey = await jose.importSPKI(PUBLIC_KEY, SIGNATURE_ALGORITHM)
2
3try {
4  const { payload, protectedHeader } = await jose.jwtVerify(
5    userToken,
6    runtimePublicKey,
7    {
8      algorithms: [SIGNATURE_ALGORITHM],
9      issuer: 'Authentication server (NO.1)',
10      requiredClaims: ['iss', 'exp', 'role'],
11    }
12  )
13
14  if (payload.exp < Math.floor(Date.now() / 1000)) {
15    const TokenExpiredError = new Error('Token has expired')
16    TokenExpiredError.code = 'ERR_TOKEN_EXPIRED'
17    throw TokenExpiredError;
18  }
19
20  // Token verified & User authenticated
21} catch (error) {
22  // Verification failed & Access denied
23}
First, we have to import the public key and convert it to the runtime-specific key representation required by the module. We can do that using the importSPKI function.
We then use the jwtVerify function, providing the token, public key, and additional options. Via the options object, we can fine-tune verification with some smart defaults. Here is what we provided:
algorithms- specifies all allowed algorithms.
Our tokens will be signed with theRS256algorithm, meaning only this algorithm has to be allowed.issuer- specifies allowed issuers.
In authentication server, we set issuer toAuthentication server (NO.1)which means that all tokens, generated by the authentication server, must have this issuer set.requiredClaims- defines which claims must be available in the payload.
We could list all the claims that the authentication server would use, but we have listed only important ones.
At the end, this function will return the payload and header, both in the form of JavaScript object. If any of these requirements are not met, the jwtVerify function will throw an error indicating that verification was not successful. Here is what the jwtVerify function did for us:
- Take the token and extract the encoded header, payload, and signature.
- Decode and convert the header and payload to plain JavaScript objects.
- Check which algorithm is used to sign the token, and throw an error if it is not
RS256. - Check that the issuer claim is set in the payload and allow only
Authentication servers (NO.1). - Check the required claims provided in the payload and throw an error if a required claim is missing.
- Verify the token signature using the RS256 algorithm.
- Return the payload and header as a result.
It is obvious that jose module does a lot of heavy lifting for us, and this is why we want to use it anyway. Without the jose module, we would have to implement all these things, done by the module, manually.
Next, in the code above, we check the expiration time provided via exp claim. We just need to compare the exp claim with the current time on the server. If the timestamp provided in the exp claim is less than the current time, the token has expired, and we throw another verification error.
If no error has occurred during the verification process, we can conclude that the token is valid and can be trusted. Application servers can now return protected data requested by the application client.
JWT and Authorization
We've said a lot of times that JWT can also be used for authorization. But what is this authorization, and how is it different from authentication?
In simple terms, authorization is the process of determining whether an entity has the necessary rights and permissions to access a particular resource. It is basically access control.
Authorization usually only kicks in after authentication, which verifies identity. Once a user is authenticated, authorization comes into play to determine what they are allowed to do or access. It usually involves using some kinds of roles and/or permissions.
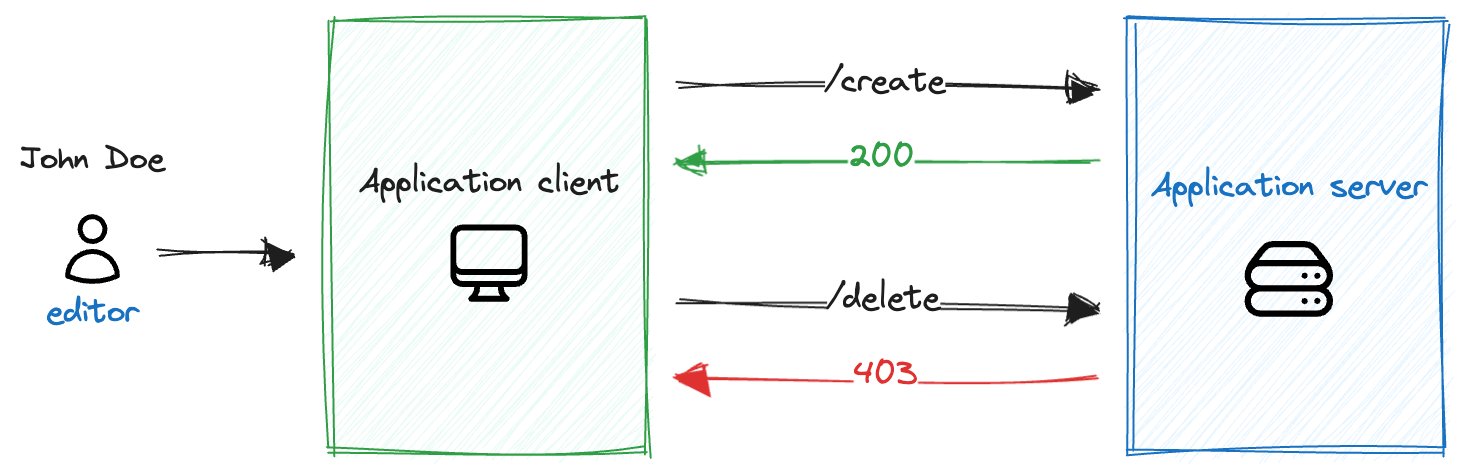
In this case, the user is already authenticated. We know his name is John Doe, and we know he has the role of editor. However, this user should not have access to all available APIs.
First verify, and then handle authorization logic.
When the user asks the application client to create a new post using the /create REST API endpoint, the server returns an HTTP Response with the status 200 OK. This means that this request has been successfully fulfilled.
On the other hand, when users try to delete a post using the /delete REST API endpoint, the server returns an HTTP Response with the status 403 Forbidden. This means that the user does not have the required permissions to access this API.
This example provides a simple use case for authorization. Depending on the permissions that the user has, different resources can be accessed.
We can easily extend the application server from our previous example to implement this behavior. Remember, we already have a custom role claim in the payload.
1// JWT payload
2{
3  name: 'John Doe',
4  role: 'EDITOR',
5  sub: '22334455',
6  iat: 1689407106,
7  exp: 1689666306,
8  iss: 'Authentication server (NO.1)'
9}
We can just use this role claim to implement simple access control. As you might have noticed, authorization logic will be implemented on the application server since this server handles the business login.
In case JWT does not have any claims to resolve permission level, like role, we would also have to modify the authentication server to generate tokens with the required claim.
Our application server now has two additional endpoints: /create and /delete. When a user makes a request to one of those endpoints, the application server needs to verify the token in exactly the same way as before.
We just have to extend the /delete API handler to make sure that user has one of the allowed roles. It is as simple as adding an if statement.
1const ALLOWED_ROLES = ['ADMIN', 'CHIEF_EDITOR']
2if (ALLOWED_ROLES.includes(payload.role)) {
3  // Can access (Response OK 200)
4} else {
5  // Can not access (Response 403 Forbidden)
6}
With this simple check, we have added authorization to the /delete endpoint. As our user has the role of EDITOR, he would not be able to access this API.
This is just a simple example to demonstrate how easy it can be to add simple authorization using JWT. Because of JWT's flexibility, we can add any claims to the token to fine-tune access control even further.
Best practices
Over the years of usage by a lot of developers and companies, several recommendations and workflows have emerged that are so common and essential that they are rightfully described as best practices.
All though "best practices" are good things to follow and try to implement in our own applications, there are so many of them that it is often not possible. I will mention some of the most important ones, in my opinion, but I encourage you to investigate this segment on your own.
Always use HTTPS when transmitting JWT. It might seem obvious, but there are many websites out there that do not use HTTPS. Remember, JWT is often used as an access token, and it is critical to protect it from network attacks and other security threats.
JWT is flexible enough to allow us to put any kind of claim into the payload. But whatever you do with the token, do not expose sensitive data in the payload. If you use a signed token (JWS), everyone can see what's in the payload. The information provided in the payload is not secure at all.
When possible, use asymmetric algorithms. We already talked about the benefits of asymmetric algorithms over symmetric ones when we compared RS256 and HS256. Always try to use asymmetric algorithms, as they provide much more security.
To improve security, always set ext claim to a reasonably short expiration time. Short-lived tokens reduce the window of vulnerability if a token is stolen or compromised. Short-lived tokens can be used in combination with refresh tokens to renew access without requiring re-authentication.
Make sure that the token is issued by someone you know, so always check for the iss claim. Every token should have this claim, and there is no reason for a token not to include it. Tokens without an iss claim should just be rejected.
This one is obvious, but always verify and validate incoming JWTs. Verify the signature to ensure the token's authenticity and integrity. Validate the token's claims to avoid accepting expired, not properly formatted, or tampered tokens.
Consider implementing token revocation mechanisms, such as blacklisting, to handle scenarios where tokens are compromised.
On client applications, tokens have to be stored somewhere. Most often than not, they are stored in the local storage of the client's browser. Make sure to protect token storage on the client side from common attacks like, for example, cross-site scripting (XSS) attacks.
Include the aud claim to specify the intended audience of the token. This helps ensure the token is used for its intended purpose. The application server should check for the aud claim and verify that the token was issued to an audience that the server is part of.
Always remember that the security of JWT depends mostly on how we use and verify it. There is no magic algorithm that can save us if the underlying use of JWT is flawed. Following best practices is a way to prevent flawed use of JWT. They help us ensure the secure and effective use of JWT in our applications while mitigating potential security risks and vulnerabilities.
Conclusion
This was probably a long read, and you have finally reached the end. I hope you have more theoretical as well as practical knowledge about JWT (JSON Web Token).
As an open standard that provides a secure way to transmit information between parties in a compact and self-contained way, JWT has emerged as a powerful and versatile tool for secure authentication and authorization in modern applications.
Understanding how JWT works is essential for its proper implementation. As applications and networks continue to evolve, so will security standards. What is good today does not mean it will be good tomorrow. We always have to be ready to act and not fall behind in this evolution. I will try to keep this article up-to-date in case there are any changes in the JWT world.
Through this comprehensive guide, I really hope you have gained the knowledge and insights needed to finally say, "Yes, I understand JWT".